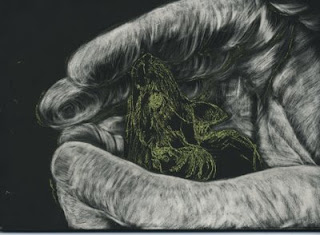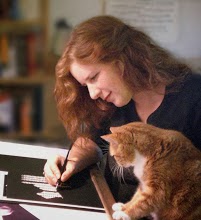
Scratchart is a wonderful medium that I was just getting into before my art hiatus. I had a couple of pieces started that were in the works (and are still partially finished) - however as I work back into my art I need to 'stretch' so I've started with some 5x7" boards with the goal of just finishing the works and not getting hung up on whether they are 'perfect' in my eyes. And this little mousie is the first!
So scratchboard, for anyone not familiar with the medium, is basically white clay on a board coated with a thin layer of ink. Whiteboards are available as well which are worked a little differently (and I have a few of those kicking around here too, maybe that can be a future post!).
With the more common black scratchboard we use a number of tools to scrape away the surface ink, revealing the white underneath. Working in scratchboard is really an excercise in values - although you can add ink color later, the bulk of your work is trying to emulate the different value gradations in your picture. It is like inkwork in reverse. I found a really nice online tutorial if you are interested in more detail on this medium: http://www.scratchboard.org/
When I got my first boards I started with a test board - just working out values and some different scratching techniques. All I had at that time was a #11 Xacto blade (I currently favor scalpel blades, they seem to hold their point a bit longer and I have an easy supply of them).

For the little mousie I started with yellow transfer paper. I have used graphite and chalk transfers in the past, but this was suggested by a colleague and so far I like it. The basics of the image are drawn freehand in pencil so that it transfers through in yellow on the scratchboard. Then you can either work from the yellow lines or make some very light scratches in the board as guidelines and then erase the yellow (this is rapidly becoming my preferred method).
 Though the #11 blade is still my favorite I've been trying to use my other tools. From top to bottom we have the #11 scalpel blade, the fiberglass brush, steel brush, and well - I don't know what that last tool is technically called, it's your standard 'scratch blade' - though it seems most hard-core scratchers don't use this tool (I, for one, don't use it often).
This is the yellow line transfer, it is intended only as a guideline to keep the proportions in place as you work. I'm experimenting with more vs. less guidelines - they can be helpful but I find the fewer I make the easier it is to keep focused using my reference picture to guide me.

This particular piece is a bit of an exercise in trying out new things - so I used the fiberglass brush mostly for the hand. It creates a soft, cloudy look. A little bit of ink washing was necessary to fix my values when I got a bit overzealous.
 After the ink wash I went back and made some fine detail in the fingers with the blade (fingerprint sworls and such). The hand was really just the backdrop for the mousie (ie I didn't feel like dealing with human skin which is tricky at best on scratchboard). This of course lightened my values too much so after this I did some more ink washing to bring it back. And finally, I start on mousie... the tip of the mouse seemed a good spot to begin.
 Working on the mouse himself - in this case my eye position was off in the original drawing, I'll fix that later. Also mousie's head is more narrow and tapered than the reference photo but again my point is to run through some work, not to nit pick on details - these are practice pieces after all - so I'm leaving his head the way it is.
More done on the mouse - I've fixed the eye with some ink, working on the fur and all those tiny little hairs on the ears! He is so tiny and delicate, a perfect subject for scratchboard!
And the finished picture -

I've gone back and adjusted some values, tweaked a few things and then did my favorite part - the whiskers!!! In this case I scratched the white whiskers and drew back in some black ones with an ink pen.
I hope you've enjoyed my little mousie, and my first step back to getting into my art. I'll be sure to post my next one (also a scratchboard) when it's done!


4 comments:
I did enjoy your mousie and the step by step process. I have never tried scratchboard, looks like fun and I love the values, and of course i LOVE black and white.
Hi Pam great to see you at it again! This is a really nice practice board....love love the mouse! You should make your icon his face!
I did some scratch boards in high school and won a few awards with them but haven't touched them again. My daughter has one up on her wall.....way way way more simple than yours :)
We made the scratch boards ourselves and used the left over ink mixture to reapply when needed is that still done?
thanks for showing the process and i hope you show more WIPs
I always wondered what 'scratchboard' was. Love the mini tutorial, and the result is fabulous. Not sure how this could be considered 'practice'; it looks perfect to me.
Jafabrit - you should totally try it, I'd LOVE to see what you do with this medium!!
Betsy - thanks! Ampersand boards are the 'gold standard', and they also sell ink for corrections. My next project will be whiteboards though (no ink, you can use any medium on them.. well, not pastel I guess!). You should check out the Scratchart board on WC if you want to see some really amazing work!!
Kasl - thanks! It turned out better than I expected (but if I keep telling myself they're 'practice' I won't freeze up!).
Post a Comment